Friday, 6 March 2015

Miss Havisham Hairstyles

Miss Havishams Hair through TV and Film:

http://briellecostumes.typepad.com/.a/6a0
134804df3cb970c0168e9de1a97970c-800wi
Miss Havisham played by Gillian Anderson in the 2011 BBC mini series
http://1.bp.blogspot.com/-yCMKM0XKDSw/VLKFOgU3KlI/
AAAAAAAAB7k/VbMYropwYYk/s1600/HAVISHAM.jpg
Miss Havisham played by Helen Bonham Carter in the 2012 film. 

http://3.bp.blogspot.com/-WgTjMf8tZEg/Uuk4aoUb_
EI/AAAAAAAAAU8/gaqYMRTDj_I/s1600/hbkkkkknnj.jpg
Miss Havisham played by Martita Hunt

Experimenting with Hair designs-

Hair Design 1:

I quite like this design as it has a lot going on in it and looks slightly more upper class which Miss Havisham is in the Upper class of the era. This was quite a popular mid-late Victorian style as there are curls on the side of the head but the majority of the curls are all falling down the back beneath the bun. If I took this design forward for Miss Havisham I would highlight the hair with white and grey to age the hair slightly so it fits the character better and maybe back comb the back more so it looks slightly more messier.


I started with parting the hair into the allocated sections so I could create each part. I parted the hair in the middle, and then sectioned off the back from the front. The front was parted in line with the ear and then clipped out the way while I could deal with the back.

Next I put the hair into a high pony tail however left the middle part of the hair down as this would all fall under the bun. Another way of doing it would be creating the bun and letting the hair fall from the bun however the Kate dolls hair I was working on isn't very long so the style wouldn't come out the same. Therefore I left the middle section down so the hair fell under the bun. Once the top part was in a high pony I started curling the pony tail with small curling tongs that I pre heated. Once the whole pony tail was curled I started twisting the hair under and gripping it into place so it would create a bun.

Once the bun was all gripped into place I starting curling the rest of the hair that fell under the bun so it was all completely curled. I then hair sprayed the curls in place. I then unclipped the front section and made sure the hair was still in a centre parting, then section one side of the head into three sections so there would be three curls each side of the head. I wanted the curls on the side of the head to be ringlets, so I held the tongs at the end of the hair and twisted it round to the roots of the hair to form a ringlet. I did this three times on each side of the head so there were three curls each side, I then sprayed the curls to hold in place.

I really like this style and think it suits Miss Havisham character well as its quite an elaborate design. I think definitely it would need to be slightly messier and matted at the back as the character hasn't done her hair for many years so the back would slightly be 'bed head' look.


Hair Design 2: 
young Queen Victoria with
a similar hairstyle
http://images.teamsugar.com/
files/users/2/20652/28_2007/The
_Young_Queen_Victoria.jpg


Here I experimented with a slightly different design something a little simpler and neat. Most portrayals of Miss Havisham she had quite big back combed hair with not much style  throughout it expect in a few portrayals she has tight ringlets. Here I created quite a traditional Victorian hair style where there is a large round bun at the back of the head, the parting is in the middle and the side sections are
plaited and joins into the bun. 

Firstly I started with the creating the sections I needed for the hair design. I grabbed my pin tailed comb and used the end to create a middle parting down the centre of the hair, then I sectioned off the sides (from the middle down in line with the ear).

I then used a large clip to hold the front sections out of the way while I do the back of the hair. I started with putting the hair in a mid-high pony tail and then span the hair around the pony tail to create a bun, I then used brown grips to grip and hold the bun secure in place.

Next was the front section, I started on the right side and combed the hair together and started plaiting it down from the ear, once I got to the end I back combed the ends slightly to hold it without having to use a hair band and then used a brown grip, tucked the end of the hair in the bun and gripped it in. I then did the same on the other side, plaiting and gripping into the bun securely. 


This hairstyle is very simple however is was very popular since Queen Victoria herself wore the same style. Personally I think fitting the character Miss Havisham and how she hasn't done her hair in many years her hair would tend to be very messy, maybe matted at the back and slightly fallen out from the years of not doing her hair. I think this hairstyle doesn't suit the character unless I would try and create the hair style slightly messier to give the effect of Miss Havishams particular look. 


Wednesday, 4 March 2015

Victorian Bride

http://farm4.static.flickr.com/3249/26783
07006_e54002eae0.jpg

The Victorian Wedding

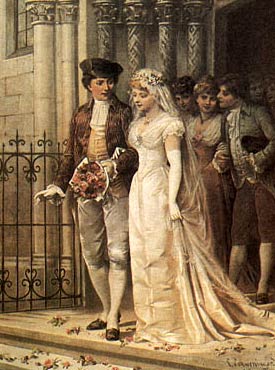
The Wedding Day has arrived, the most important event in a Victorian girl's life. It is the day her mother has prepared her for from the moment she was born. The Victorian girl knew no other ambition. She would marry, and she would marry well.

Naming the Day

The wedding itself and the events leading up to the ceremony are steeped in ancient traditions still evident in Victorian customs. One of the first to influence a young girl is choosing the month and day of her wedding. June has always been the most popular month, for it is named after Juno, Roman goddess of marriage. She would bring prosperity and happiness to all who wed in her month. Practicality played a part in this logic also. If married in June, the bride was likely to birth her first child in Spring, allowing her enough time to recover before the fall harvest.

Brides were just as superstitious about days of the week. A popular rhyme goes:


Marry on Monday for health,
Tuesday for wealth,
Wednesday the best day of all,
Thursday for crosses,
Friday for losses, and
Saturday for no luck at all.


Brides have not always worn white for the marriage ceremony. In the 16th and 17th centuries for example, girls in their teens married in pale green, a sign of fertility. A mature girl in her twenties wore a brown dress, and older women even wore black. From early Saxon times to the 18th century, only poorer brides came to their wedding dressed in white--a public statement that she brought nothing with her to the marriage. Other brides wore their Sunday best.

Color of the gown was thought to influence one's future life.


White--chosen right
Blue--love will be true
Yellow--ashamed of her fellow
Red--wish herself dead
Black--wish herself back
Grey--travel far away
Pink--of you he'll always think
Green-ashamed to be seen


victorian wedding
The wedding day was considered to the

 most important day in the life of a Victorian girl. 
The girls were from very beginning had been 
taught to marry and to take of the family
 The marriage of a girl was something very special for
 the mother, the soon to be bride and her family.
                     http://www.victorian-era.org/
Ever since Queen Victoria wed in 1840, however, white has remained the traditional colour for wedding gowns and bouquets. A woman then used her dress for Court Presentation after marriage, usually with a different bodice.
The early Victorian wedding dress had a fitted bodice, small waist, and full skirt (over hoops and petticoats.) It was made of organdy, tulle, lace, gauze, silk, linen or cashmere. The veil was a fine gauze, sheer cotton or lace. The reasonable cost of a wedding gown in 1850 was $500, according to Godey's, with $125 for a veil. By 1861, more elaborate gowns cost as much as $1500 if constructed with lace.

Formal weddings during this period were all white, including the bridesmaid's dresses and veils. Veils were attached to a coronet of flowers, usually orange blossoms for the bride and roses or other in-season flowers for the attendants. The bride's accessories included: short white kid gloves, hanky embroidered with her maiden name initials, silk stockings embroidered up the front, and flat shoes decorated with bows or ribbons at the instep.

Mid Victorian:
For the mid-Victorian bride (1870s) there was an emergence of middle class wealth, and with it a display of their new riches. Wedding gowns fashioned by Worth in Paris were the ultimate status symbol. And if one couldn't afford an original, one copied them. Full court trains were now part of the wedding ensemble, as were long veils, a bustle, elegant details and two bodices--a modest one for the wedding and a low one for special occasions.

Late Victorian:
The late Victorians (1890s) saw the bustle disappear, a demi-train and large sleeves now in fashion. If the bride married in church, the dress must have a train, with a veil of the same length. The veil could be lace or silk tulle. From the mid-Victorian era to the 1890s, the veil covered the bride's face and was not lifted until after church. The veil was not used as a shawl after the wedding any more, however. White kid gloves were long enough to tuck under the sleeves, and had a slit in one finger to slip the ring on without removing the glove. Slippers were of white kid, satin or brocade and the heels rose to one inch

As for jewellery, diamonds have always been popular. When white dresses were in vogue, pearl and diamond combinations were fashionable. The mid-Victorians had a more extravagant display of wealth, often a diamond tiara for the ceremony. Combination pieces of diamond jewellery that could be separated later as individual pieces were popular. Traditionally, the jewellery worn by the bride was a gift from her husband. The earlier in the day the wedding, the less jewellery.


Bride getting dressed, 1890s
https://threadingthroughtime.wordpress.com/
2013/10/04/the-late-victorian-bridal-trousseau/

Bride in her dress
Victorian couple on their wedding day


http://www.literary-liaisons.com/article003.html

Tuesday, 3 March 2015

Death Masks

Photo used to created my Death Mask


After our lecture talking about consumption and deathliness we went through all the causes of common deaths in the Victorian period. Another subject we looked at was mourning death in the era, this showed us a variety of ways the Victorians mourned in the 1800's as they were so fascinated about death. One of the popular mourning rituals to do was to create a death mask so they could reserve the faced of their loved ones for many years.

In our recent lecture we took a photograph of our face in black and white and tried to create lines and shadows on the face. Once the photo was taken we then studied the lines on the face and tried to recreate the image on our faces like a death mask.

Firstly I started with getting my Charles Fox supra colour paint out and two brushes, foundation brush and a thin, small square brush. I started with creating the darkest parts of my face first which was pretty much back, I started with the foundation brush and started painting on the lines of the face following the photograph. I then mixed the black paint with the white to create a dark grey and filled in the areas that were second darkest on my face, I then added a little bit more white to the grey to create a light grey colour for the rest of face with highlights of nearly completely white. I used my small brush to apply smaller areas and create the lines on my face.

The idea of the face mask was to recreate the photo, I wanted to portray mine with sharp edges and lines down the face. With the use of the different greys my mask looks quite abstract and the harsh lines came out very strong; this is what I wanted to portray.


Final Mask in Colour
Black and white Version 


History of the death mask:

The eerie death mask of Francois Courvoisier, taken after his execution by hanging in 1840 and exhibited in Madame Tussaud’s ‘Chamber of Horros’ well into the 20th century.
https://ainsworthandfriends.wordpress.com/2013/02/


     Ned Kelly death mask, 1880

This is a plaster death mask of the head of bushranger Ned Kelly, including the neck and partial right shoulder. Ned Kelly was hanged at Melbourne Gaol on the morning of 11 November 1880. Immediately after his body was taken down from the gallows, his hair and beard were shaved off and a mould taken of his head by Maximilien Kreitmayer. The mask is a unique three-dimensional representation of one of Australia's better-known historical figures, created shortly after his death.

The 'modem' method for making a death/life mask requires the application of oil or grease to the subject's face then a coat of plaster of paris that is allowed to harden before being is removed. This creates a mould that can be used to cast the mask. Because they are created from a mould taken shortly after a person dies, death masks offer a unique view of the dead person. Formal portraits, whether painted or photographed, present a two-dimensional image, often reflecting the way a person wishes to be remembered.

http://www.nma.gov.au/collections-search/display?app=tlf&irn=76705


Making a plaster death mask, New York circa 1908, George Grantham Bain Collection, Library of Congress
Sir Issac NewtonThe making of death masks became popular in the 1800s, but the practice has much older roots. The first masks and effigies made in wax directly from the features of the deceased date from medieval Europe.
http://onelondonone.blogspot.co.uk/2010/10/macabre-look-at-death-masks.html


Consumption and Deathliness

Causes for Deaths in the Victorian Era-

  • Infant Mortality and Childbirth
  • Fatal Diseases
  • Death and the City
  • Cholera
  • Industrial Deaths

Child birth
http://mentalfloss.com/sites/default/files/styles/
insert_main_wide_image/public/childbirth_0.jpg

Industrial working 1800's
http://www.regentsprep.org/regents/global/
themes/conflict/social.cfm
Cholera poster 1800's
http://www.sciencemuseum.org.uk/broughttolife/
themes/publichealth/cholera.aspx

The spread of cholera:
In such conditions disease was inevitable, but Victorian London’s experience of cholera in 1832 would have a huge social impact. Spread via the bacteria-laced diarrhoea of its victims, cholera’s violent and rapid assault on the human body was terrifying. Although it killed fewer than other contemporary diseases - such as influenza or tuberculosis - it was cholera that provided a deadly backdrop to this era of social and economic upheaval. There was no known cure - although plenty were offered by quacks. Commonly known as Asiatic cholera, it seized the public’s imagination with India, supposedly the crown jewel in Britain’s expanding empire, identified as its origin.

The death of little Sarah was but one statistic of the London cholera epidemic of 1849 which killed 14,137 people.
http://partleton.co.uk/sarah1845.htm

These silver snuff boxes were presented to two men for their work during the first and second cholera pandemics. Can you read the inscriptions? One is dedicated “To Robert Fortescue, Surgeon, in testimony of the gratitude and esteem of his fellow townsmen for his humane and unceasing attention to the Poor during the awful visitation of malignant cholera at Plymouth A.D.1832.”
http://www.sciencemuseum.org.uk/broughttolife/objects/display.aspx?id=5407


Mourning Traditions During the Victorian Era-

Memento Mori:
Memento mori is a Latin phrase meaning ‘remember you must die’. A memento mori is an artwork designed to remind the viewer of their mortality and of the shortness and fragility of human life.

The advent of photography in the Victoria era provided an important new way for the bereaved to remember their dead.In many cases, poverty stood squarely in the way of obtaining expensive painted portraits capturing loved ones in the prime of their lives. Hence cheaper photography sessions began to grow in popularity – especially among bereaved families, whom in many cases, were finally able to obtain the only image they had of the deceased.

Post-mortem photography – also known as memorial portraiture or "memento mori", dovetailed with the era’s high mortality rates. The earliest images of this trend rarely featured coffins and would often see the deceased posed in an everyday position in an attempt to capture their essence during life. Props such as toys for children and flowers would also be included, braces would help to position the body and in some cases the subject’s eyes would be fixed open or later drawn onto the prints. Responding to demand, some photographers would eagerly advertise their post-mortem specialities – which would have to be carried out quickly after death before decomposition began to set in.
The trend for mourning photography began to fall out of fashion in the early stages of the 20th century as snapshots became more affordable and commonplace.


http://www.huffingtonpost.co.uk/2013/01/30/memento-mori--victorian-mourning-photography-immortalising-loved-ones-death_n_2580559.html


Mourning Jewellery:
Walk through an old New England cemetery and you will see that death came early and often in the
Mourning hair locket
http://40.media.tumblr.com/b553d879a
e393c4d0365911f43561ce2/tumblr_mgxycj
XjMx1rdurh7o1_400.jpg
eighteenth and nineteenth centuries. Disease, childbirth, and the harsh environment all contributed to the high mortality rate. As a result, the specter of death was a persistent presence that permeated the lives of New Englanders. One way in which they coped with these constant losses was to memorialise their lost loved ones by wearing mourning jewellery.

Mourning rings were the most common form of early mourning jewellery. They were given to family members and close friends and were usually paid for through the estate of the deceased. These rings ranged from plain gold bands to rings set with diamonds, pearls, and miniature portraits on ivory. However, while the elaborateness of mourning rings varied they were all inscribed with the name, date of death, and age of the deceased. Sometimes haunting epitaphs such as “not lost but gone before,” “we must submit,”
Mourning locket with photograph
https://s-media-cache-ak0.pinimg.com/
236x/e4/9d/5f/e49d5f5424a6352ff01026
a294901a56.jpg
and “we’re his last” were included not only to remind the wearer of the departed but of their own mortality as well. 

Styles of mourning jewellery were heavily influenced by the current fashions. Mourning jewellery featured symmetrical, geometric shapes influenced by classical architecture, symbols such as funerary urns and plinths, and weeping women dressed in ancient Roman-style costume. In the first two decades of the nineteenth century rings were still the most common form of mourning jewellery, but brooches and miniatures set in pendant settings gained favour. Often these pieces incorporated the hair of the deceased into their designs. Brooches featured woven plaits or cut curls and feathers of hair set in compartments under glass, while miniaturists would either glue hair onto the surface of the picture or grind it up and mix it with the paint.


http://www.historicnewengland.org/collections-archives-exhibitions/online-exhibitions/JewelryHistory/themes/Mourning.htm


Mourning and the market place:
Mourning Etiquette

  • Cover mirrors with black fabric 
  • Friends and family might stay with the bereaved overnight since that is the time of day when deep sadness typically sets 
  • wrapping door handles black crepe tied with a white ribbon to let people know they shouldn't ring the bell as it could jar the nerves of the mourners
  • A person in deep mourning did not attend social events or places of amusement for up to a year.
  • It was suggested that calls of condolences be made 10 days following the death or when the person felt well enough to show up for church services. 
https://uk.pinterest.com/pin/423268064948900029/
Victorian Professional Mourners, 1800s. Symbolic protectors of the deceased, the mute would usually stand near the door of the home or church.


Montagne Noire Clothiers presents Deuil Noire (French, "black mourning"), a line of 19th century ladies mourning garments. Our gown series is an interpretation of the four prominent gown silhouettes of the 19th century: Empire, Romantic, Princess and Belle Epoque.
https://slm-assets2.secondlife.com/assets/877533/lightbox/ef5e6a1fa480bc0a9a88105ab1eaeb94.jpg?1277162998


Three Solutions of portraying Miss Havisham

Miss Havisham Portrayal 1: 
Aged
 The first make-up chart I created for Miss Havisham was how everyone normally sees her portrayed in most Great Expectations film and that is old. In many versions of the novel Miss Havisham is portrayed as being very old and decayed, therefore I created a face chart that would represent this particular look. The time period for this look would be when Pip and Estella is much older and Miss Havisham is much older and fragile and this would be late Victorian period.


How to produce the look:
What products do I need?

  • Charles Fox foundation palette
  • Illamasqua white skin base foundation 
  • Illamasqua primer
  • lllamasqua white loose powder
  • Charles fox eyeshadow palette (brown, grey and white)
  • Charles Fox white supra colour 
How I would create the ageing would be through powder products, you can do this with grease products so apply Charles Fox supra colour over the foundation and blend. However I prefer creating the ageing lines with powders as I find it easier to blend and it look much more realistic.

  1. Mix the lightest shade of foundation with the models natural colour and the white skin base foundation. This will give a lighter version of there skin colour. Once mixed apply a small amount of primer to the whole of the face and then apply the foundation. Make sure the ears and down the neck is covered. 
  2. Then using the Illamasqua loose powder, powder the whole face to set the make-up and ready to apply the powder lines. 
  3. Then using a small angled brush ask your model is she could screw up her face and using the brown powder create lines on the face. This would be on the forehead, between the brows, around the eyes, around the nose and around the mouth area. You can use a mix of the brow powder or the grey to create the depth in the lines on the face. 
  4. Next using the white eye shadow, highlight around the lines to create dimension on the skin. 
  5. Using a blush blush and the grey eye shadow ask your model to suck in her cheeks and apply the powder to the hollows of the cheek so they appear sunken. Do this again however shade around the eyes with the grey so the eyes look tired, old and sunken in. 
  6. Finally you can add to the look by using a mascara wand and white supra paint to go into the lashes and the brows with the white to make the hair look aged. 


Miss Havisham Portrayal 2: 
Young Crazy
The second portrayal I created for Miss Havisham was a younger version of her. I wanted the look to be just a little after she was left at the alter by her husband-to-be. The look I was going for was her skin and still looking quite young and youthful, however her eyes very red as doesn't sleep properly and she been crying and distressed because of what happened. Her lips I wanted to be dry and slightly cracked where she's not been taking care of herself and has been picking at her lips.


How to produce the look:
What products do I need?

  • Charles Fox foundation palette 
  • Illamasqua primer
  • Illamasqua white base foundation 
  • Illamasqua loose powder
  • Duo adhesive glue
  • Scabby blood
  • Charles Fox Blusher palette (red and pink)
  • red eye liner
  • mascara
  • mascara wand 
  • Charles Fox brown powder
  1. Firstly start with preparing the skin with primer, the mix the models foundation colour together and add a bit of white base foundation to lighten the colour. For this look we want her skin to look naturally pale as she's still quite young and fresh. Once the foundation was applied then powder the face to set the make-up in place.
  2. For the cheeks I want them lightly rosy as I still want a bit of colour on the cheeks, so with the pink blush and a blusher brush apply it to the apples of the cheeks 
  3. Using a small brush and the red blush powder slightly go around the eyes to make them look red and slightly crazy looking, like she's had no sleep. The red can go underneath the eye and on top of the lid blended outwards. 
  4. Using the red liner go into the water line of the eye and line with the red.
  5. Next using the Duo glue, apply a thin layer to the lips. (if you don't want to wait to dry then you can hair dry in between layers). Once dry apply another layer of duo glue. 
  6. Then with your fingers gently pick into the dried glue and ask your model to stretch her lips as this will crack the glue on the lips to give a realistic effect. To dry the skin out more, apply white loose powder over the lips. Fill in some of the cracks slightly with the scabby blood.
  7. Brush through the brows with a mascara wand and fill in slightly with a brush and brown powder (or whatever matches your models hair colour). Then brush through the lashes and apply a small amount of black mascara to the lashes to darken them slightly. 

Miss Havisham portrayal 3:
Old/burnt

The final face chart I created portraying Miss Havisham was the end of the novel where Miss Havisham burns to death. This is the part of the final moments of her life, when she's looking very old and withered. The look I was going for was Miss Havisham partly burnt on the face and the other side aged. This is the look I would create when imagining what Miss Havisham looks like after being partly burnt. 


How to produce the look:
What products do I need?

  • Charles Fox foundation palette
  • Illamasqua white base foundation 
  • Illamasqua loose powder
  • Charles Fox eye shadow palette (brown and grey) 
  • Charles Fox supra colour (bright red, dark red, black, purple, white, yellow)
  • Latex/duo glue 
  • False blood 
  • barrier foam
  • hair dryer
  • Vaseline
  1. Firstly I would start with creating the burn, so the latex is put straight onto clean skin and then we can apply the rest of the products on top. Firstly I would pour the latex into a bowl so it's easier to apply to the face, then I would apply barrier foam to the skin to protect it. 
  2. Next I would start applying the latex to the area where I want the burn, you want to apply a few layers of latex and build it up so in between layers if you want it to dry faster you can hair dry the latex (make sure it's on a cool heat).
  3. Once you've build up all the layers you want on the face, you can use your fingers of tweezers, gently to pull away parts of the latex to create craters in the skin and bumps. 
  4. Once the latex is all dry and set, you can then start applying the foundation to the skin. Start with mixing the foundation from the Charles Fox palette and the Illamasqua white base foundation to create a whiter version of your model skin tone as Miss Havisham has very pale skin. Once the right colour is mixed apply the foundation over the face, down the neck, ears and gently over the latex to make it a skin colour before applying the burn colours. 
  5. Next using the loose powder, powder the face to set the foundation and to take away and grease lines. 
  6. The using a small thin brush and the brown powder, ask your model to screw up her face and then start drawing in lines around the face to create the wrinkle lines. With a blusher brush you can then go into a mix of the brown and grey eye shadow powder and contour the cheeks to look sunken in and then the same around the eye socket. 
  7. Next we'll start working into the burn, its quite random and you can use a mixture of colours where you think looks good, I would start with the red supra colour for the base of the burn and then start blending in the dark red, black and purple to the latex area. You can also use yellow supra colour and some Vaseline to make the skin look slightly yellow with pus. 
  8. The you can add the blood, maybe into the craters of the skin and in dips. 
  9. For the lips I wanted them to look very dry and irritated, so I would start with applying the duo adhesive glue over the lips and get your model to stretch there lips while it dries so that its dries cracked when normal. You can apply two layers of this over the lips and then powder them when dry to give a very dry look. Then on the burnt side you can go in with the red supra colour and blood to make the lips look like there bleeding and then just dry on the other side. 
  10. Lastly was working into the eyebrows, on the  aged side use a mix of the white and yellow supra colour and a mascara wand to comb into the brow and the lashes. Then for the burnt side of the face I would go in with a dark grey on the eyebrow and the lashes on that side. 

Sunday, 1 March 2015

Miss Havisham Practise look


After creating a burns face chart for my Miss Havishams  I wanted to try to
create it for my final look for Miss Havisham. My initial idea was half the face showing old age and wrinkles in the skin, for the other side I wanted burns going down the side of the face. The burns represent the end of the book where Miss Havisham burns to her death. I started off with applying latex to the skin, I started on the forehead and worked down the side of the face. I applied around 3 layers of latex with hair drying it in between layers to dry the latex. I then used a spatula to break to the latex to create holes and marks in the skin. I then used illamasqua white skin base foundation and a mix of Charles fox foundation from the palette. Next I used a white power and powered the whole face. I then started working on the burn, I used a mixture of 2 reds, black and purple from the Charles fox supra colour. I worked into the burn with with colours and then added blood on top of the burn. I then started working on the ageing of the face, I tried creating the ageing with supra colour with mixing red, green, yellow to create a brown colour for the lines in the skin. I asked my model to screw her face up and I followed the natural lines of the face and added done extra ones on the face and around the lips. I then used another brush to try and blend the lines into the face more. I then started on the brows and lashes as I wanted them to look old (so basically white) so I used a mascara wand and white supra colour and painted the brows and lashes white.
  • Products: 
  • Latex
  • Charles Fox foundation palette 
  • Illamasqua white base foundation
  • Illamasqua loose powder
  • Supra colour
  • blood

When creating Miss Havishams we have to create our final look twice, this is for continuity. When creating my look I have to create it knowing I can create it again exactly the same. After creating this look I decided the area of burns on the face is quite large and is quite random so I thought about re creating it and thought it may be quite hard to create continuity. However I thought for my first attempt at the look it' went really well and I was really pleased with how it looked overall. I think next time I could improve on the burns area and maybe make the area smaller and easier to work with next time.  I think I could improve on my ageing skills and blend the lines in more to make the ageing look natural.